Cakewalk // Documentation // Music Creator 7 // Track view
Table of Contents Previous Next Index

View reference ► Track view

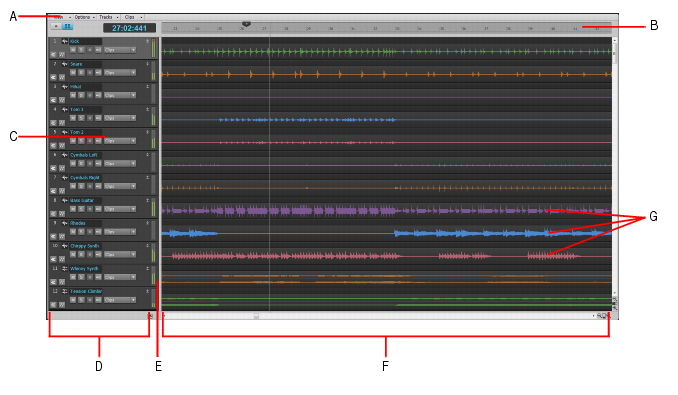
The Track view is always visible. It is the main window that you use to create, display, and work with a project. When you open a project file, the Track view is displayed for the project. Closing the Track view closes the project.
The Track view is divided into several sections: toolbars (at the top), the Navigator pane, the Video Thumbnails pane, the Track pane, the Clips pane, and the Bus pane. You can change the size of the panes by dragging the vertical or horizontal splitter bars that separate them.
Figure 355. The Track view
A. Track view menu B. Time ruler C. Track strips D. Track pane E. Splitter bar F. Clips pane G. Clips
In addition, all of the current track’s controls, plus a few that are only available in the Console view, are contained in the Track Inspector, which is an expanded version of the current track’s controls located on the far left side of the Track view. You can hide or show the Track Inspector by pressing I on your keyboard.
Figure 356. Track view menus
The View menu contains the following commands:
*
Navigator Show/Hide. Show or hide the Navigator pane.
*
Video Thumbnail Track Show/Hide. Show or hide the Video Thumbnails track. The Video Thumbnails track can be displayed even if there is no video in your project.
*
Auto Track Zoom. This command enables/disables Auto Zoom, which allows you to automatically enlarge the track that has focus. All other tracks are minimized. When a new track is focused, it swaps heights with the previously focused track.
*
Display.  Use the submenu to select the desired display option:
*
Display Ghosted Data.  Show or hide all data types, regardless of which data type is selected in a track’s Edit Filter control. All but the selected data type will be shaded, or “ghosted”. This allows you to see all data types in context while editing a specific data type.
*
Vertical Grid Lines. Show or hide vertical grid lines in the Clips pane that are one measure apart. Use the submenu to specify how the vertical lines should display.
*
None. Vertical grid lines are not displayed.
*
Behind Clips. Vertical grid lines are displayed, but clips will draw on top of them, so clip contents will not be obstructed.
*
In Front of Clips. Vertical grid lines are displayed and drawn on top of clips, always visible.
*
Fit Tracks and Buses to Window. Adjust the vertical track heights to fit all tracks in your project in the Track view.
*
Fit Project to Window. Fit the entire project, or as many tracks as possible, into the Track view.
*
View Undo. Returns the Track view to the previous zoom level (undo zoom).
*
View Redo. Negate the last View Undo command (redo zoom).
The Options menu contains the following commands:
*
Auto crossfade.  Enable or disable automatic crossfades.
*
Crossfade Type.  Specify default fade in, fade out and crossfade curve types.
*
Select Track Envelopes With Selected Clips. Selecting a clip will also select any overlapping track envelopes.
*
On Stop, Rewind to Now Marker. The Now Time jumps back to the Now Time Marker whenever playback stops.
*
Stop at Project End. Playback will automatically stop after the last event in the project is reached. When this option is disabled, playback will continue beyond the end of the project and playback can also be started in an empty project.
The Tracks menu contains the following commands:
*
Bounce to Track(s). Combine one or more audio tracks into a submix.
*
Clone Track(s). Copy the selected track(s). You can choose to include events, properties, sends, and/or effects in the copied track(s), and specify a destination.
*
Delete Track(s). Delete the selected track(s), including all its track properties and all its clips and events. Music Creator does not put deleted information on the Clipboard for later copying.
*
Wipe Track(s). Delete track contents but leave track properties intact. Music Creator does not put wiped information on the Clipboard for later copying.
*
Copy Track Name(s) to Clip Name(s). Copy track names to clips in corresponding tracks.
The Clips menu contains the following commands:
*
Bounce to Clip(s). Combine selected audio clips into a single clip.
*
Convert to Stereo. Convert any selected mono audio clip(s) to stereo.
*
Convert to Mono. Convert any selected stereo audio clip(s) to mono.
*
Create Clip Selection Group. Place all selected clips in a new selection group.
*
Remove from Clip Selection Group. Remove all selected clips from any selection groups they may belong to.
*
Unlink Step Sequencer Clips. Unlink the selected step sequencer clips, allowing each clip to be edited separately from each other.
*
Convert MIDI Clip(s) to Step Sequencer. Convert any selected MIDI clip to a step sequencer clip.
*
Convert MIDI Controllers to Envelopes. Open the Convert MIDI To Shapes dialog, which lets you convert MIDI controllers into automation envelopes.
*
Table 218.  
The Bus pane contains all of your project’s buses. You display the Bus pane by clicking the Show/Hide Bus Pane button , which is located at the bottom of the Track view.
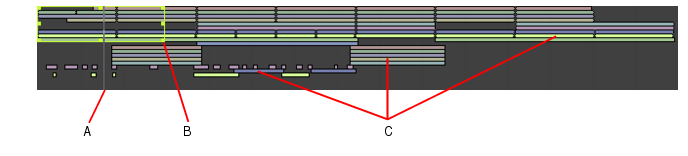
Figure 357. The Navigator pane.
A. Now Time B. Drag node to zoom C. Clips
Copyright © 2024 Cakewalk, Inc. All rights reserved
Sitemap | Privacy Policy | Legal